The ARP spoofing attack, also known as ARP poisoning, is a technique used to attack local networks. It allows intercepting the communications between two machines. This article explains how it works, how to use it and how to protect yourself against it.
The ARP Protocol#
First, we need to define what is the ARP protocol. ARP is the abbreviation for “Address Resolution Protocol” and is operating in the Internet layer of the TCP/IP model. I won’t get to the details of TCP/IP but what you need to know is that two types of addresses are used at this point:
- The IPv4 address is an abstraction allowing to identify machines on the network. It is made of 4 bytes in the form A.B.C.D.. Note that if IPv6 is used, the NDP protocol is used instead of ARP.
- The MAC address is the physical address of the network card. It is supposed to be unique and is made of 6 bytes and is represented as AF:43:3E:54:FF:42.
For two machines to communicate in the same network, the MAC address is the one being used. This is where the ARP protocol comes. It is in charge of finding the MAC address of a machine using its IP address. To do that, there are two solutions. Either the machine has already an entry in its cache and knows which MAC address belongs to which IP, or not. If not, the machine will broadcast a request on the network (which means that all addresses will receive the request). The machine we look for is supposed to be the only one to reply to the sender of the request.
It works fine, but no check is done on the different requests; making the protocol insecure.
Workflow of the Attack#
The Theory#
The purpose of ARP spoofing is to make a machine believe that our machine is the one it wants to communicate with. For this purpose, we will forge a request (the one that is broadcasted in the previous part) pretending to be the router and send it to the victim.
This request will be very similar to a legit one, but we will change the MAC address. Instead of the MAC address of the router, we will pull our machine’s MAC address (in the case we want to pretend we are the router; we could put any other MAC address). When the victim’s machine receives the packet, it will update its cache with the wrong information… and there it is, we will now receive whatever the victim is sending to the router. Of course, we’ll have to send the forged packet on a regular basis to be sure the wrong information is not changed in the victim’s cache.
The Practice#
Disclaimer: Putting the following attack in practice is illegal unless you are testing it on your own material or with the authorization of the networks and machines owners.
The theory is good, but what about practising a little? We will now use the ARP spoofing to process a Man in the Middle attack. Briefly, this attack consists in intercepting the communications between two machines, i.e. if Bob and Alice are communicating together, Bob sends a packet to the router, the router sends the packet to Alice, and so on. Now, each packet will go by our computer before reaching its destination. It could be used to intercept the communications between Bob and Alice but also to change the content of the packets (e.g. to include malware)
For this purpose, we will use two tools: Ettercap and Wireshark. The first one will take care of the ARP poisoning while the second one will be used to see the packets going through.
First, we’ll need to enable IP forwarding. If we don’t, the packets we intercept will stop at our machine, and so the communication between Bob and Alice will be broken. To do that, we’ll type the following command. The change won’t be permanent, and it will be disabled the next time the computer is rebooted.
sudo echo 1 > /proc/sys/net/ipv4/ip_forward
Once it is done, we’ll launch Ettercap, and we’ll go to “Sniff / Unified sniffing” and select the interface we are using to connect to the network (e.g. eth0). Then, we will select our target. For this purpose, we’ll open “Hosts / Hosts List” and execute a scan to find hosts connected to the network. You should then have something looking like the following screenshot.

Then, we will define our router (192.168.1.1) as the first target and a computer that is connected to the network (192.168.1.105) as the second target. Please note that whoever is the first or second target is not important here.
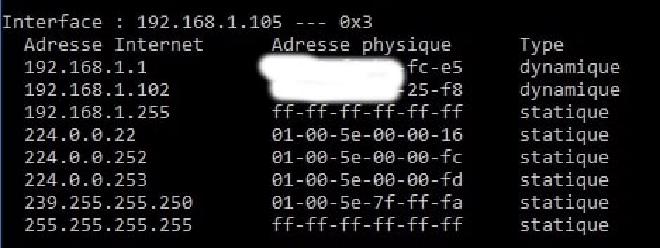
Before we continue on the attack, let’s open a shell on the target machine and launch the command arp -a which will show the state of the cache. We can then see that the correct mac addresses are associated with the correct IPs.

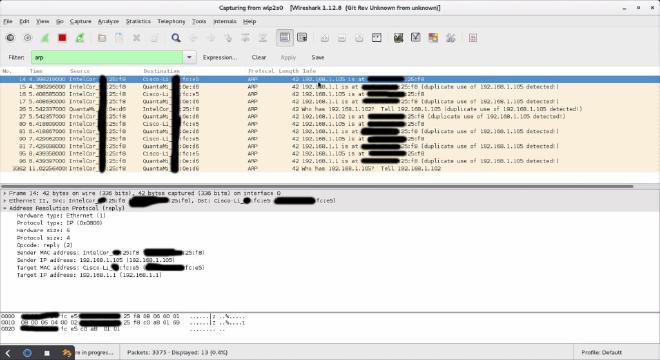
Now we will go to “Mitm / ARP Poisoning” in order to launch the attack. Before that, Wireshark has been launched and configure to see the ARP requests going through the network.

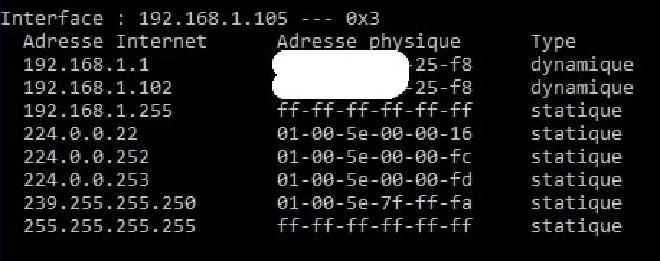
As we can see on Wireshark, our forget ARP packets are sent, so let’s check again the victim’s ARP cache to see if the attack has been successful.

Without any surprise, we can observe that the victim’s ARP cache contains the attacker’s MAC address instead of the router’s one.
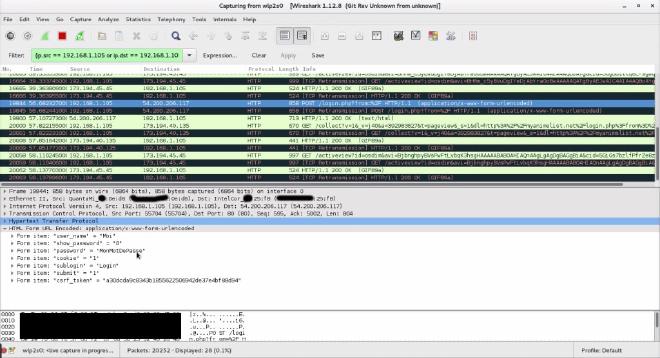
Now, when the attacked machine sends packets somewhere, instead of going to the router and then wherever they need to, they will first hit the device used to perform the attack. Now, we will use Wireshark to inspect the HTTP traffic coming to/from the victim.
If we log into a website that does not make usage of SSL using the target machine, then, magic! You can see on the following screenshot that the connection IDs have been intercepted and that the victim is trying to access the service with the couple username/password “Moi” and “MonMotDePasse.

What can we learn?#
From practising this attack, we learned a few things:
- This attack is extremely easy to perform
- The guy who told you to be careful about public WiFis was correct
- Unencrypted traffic is wrong
Other possibilities offered by the attack#
In this example, we only sniffed the packets going through the machine using HTTP, but it is totally possible (even if harder) to succeed in this attack sniffing HTTPS traffic.
The reason for which it is more difficult is the fact that HTTPS traffic uses some signed certificates. A malicious individual would then have to steal the certificate’s private key. If he doesn’t, an alert will show on the victim’s computer saying that the certificate is invalid (however the victim still have the possibility to ignore this alert).
The attacker could also change the pages visited by the user with some malicious Flash or JavaScript code to infect the victim’s machine with some malware, or process to some DNS spoofing so he can redirect the victim to a server of his choice.
How to protect yourself#
So, ARP is broken. but fortunately, there are ways to protect yourself.
Using a VPN#
This is probably when you connect your computer to a public network (Airport, Hotel, …) that you are exposing the more. In this case, the best option is to use a VPN with a killswitch preventing any packet from not going through it. Then, the traffic is encrypted, and a potential attacker will not be able to do anything. You could say “Yes, but if I am only connecting to HTTPS websites, then it’s alright, isn’t it?”. The answer is no. First, you could still be subject to DNS poisoning. Then, a large proportion of websites are using HTTPS and loading JavaScript via HTTP, so the risk is still the same!
Using a static ARP table#
Another solution is to use a static ARP table instead of a dynamic one as in our example. This works well but is not necessarily the most convenient option.
Watch the network#
It is very easy to detect ARP attacks (as you may have noticed before with the Wireshark screenshot). You could use some tools like Arpwatch, Prelude-IPS or Etherwall to detect it. Even better, if you use some NIPS (Network Intrusion Prevention System), you will be able to stop the attack automatically.